HOW TO HANG WALLPAPER
Hanging Wallpaper
Essential guide to wallpapering
The first step is the most important – get this right and the rest is easy.
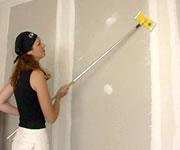
Prepare the walls
Wallpaper is actually easy to hang if the walls – and you! – are well prepared. Follow the manufacturer’s instructions for the type of paper you have chosen.
Surfaces painted with acrylic paint- Sand with 120 grit sandpaper to get a smooth surface. Apply one coat of oil based pigmented sealer or Apco Aquaseal. This will prevent showing through after the wallpaper has been applied. Sand down the sealer with 80 grit sandpaper and dust down with a damp cloth.Sealing the surface prevents the acrylic paint from softening and the new wall covering falling off.
New paper faced plaster board (less than 4 weeks old)- Wipe the wall with a damp cloth to remove all dust. Apply one coat of oil-based sealer or Aquaseal.
Old paper faced plaster board- Sand with 120grit sandpaper. Wipe the wall with a damp cloth to remove all dust. Apply one coat of oil- based sealer or Aquaseal.
Wallpapered wall-
1. Remove any old paper. METYLAN Active Wallpaper Remover makes that easy.
2. Repair any imperfections in the wall/plaster, and sand smooth with 80 grit sandpaper. Remove the dust with a damp cloth.
3. Brush the wall surface with a liberal coat of SHUR-STIK wallpaper size and let it dry. This makes it much easier to position the wallpaper when it is time to start hanging.
Quick tip: Different wall surfaces need different preparations, so ask your retailer for their advice. Guidelines are also on the wallpaper label.
Plan where to start in the room
Start near the main source of light and work away from it, aiming to finish in a discreet area, such as behind a door.
If you are using patterned wallpaper on a feature wall, start in the middle of the wall.
Quick tip: Check that each roll is the same design and batch number before you start cutting the paper.
Make a plumb line
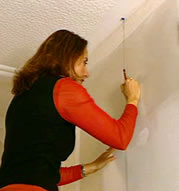
Using a plumbline – a straight-line device that professionals use – will ensure that even if your ceilings or floors are not level, the wallpaper will still be straight. Always hang your first strip of paper next to a plumbline.
Using a plumbline to help you wallpaper:
1. Measure the width of your paper.
2. Measure the same distance out from the corner in the direction you intend working.
3. Come back 15mm towards the corner from the narrowest point of the plumbline, and make a mark closer to the ceiling.
4. Drive in a small nail and hang the plumbline from it.
5. Once the plumbline is steady, lightly mark the wall with a pencil every 20 to 30cm down the length of the line to the floor. This will give you a perfectly straight vertical line to hang your first strip of wallpaper against.
Quick tip: Check that each roll is the same design and batch number before you start cutting the paper.
Tips for pre-pasted, paste-the-wall and unpasted papers.
Prepare the paper
Cut the paper
1. Measure one wall from the the skirting board or bottom edge up to the ceiling.
2. Add 10cm to allow for trimming.
3. Cut the first length. Use this length as your guide for cutting the rest of the paper into lengths.
If you have Paste-the-wall paper, proceed to Step 3.
Pre-pasted paper
Soak the paper
![]()
For pre-pasted paper, a brief soaking in water is vital, to activate the paste that is on the back.
- Fill a water trough with lukewarm water, and place it in the centre of the room, on a plastic dropcloth or old sheet.
- Now, loosely reroll the cut lengths of paper, from the bottom edge, with the pattern or texture on the inside.
- Place the rolled length in the water, make sure it is fully covered for about 15 seconds, then pass the top edge of the length under the water trough wire and slowly draw the paper out of the trough. Check that all the paste on the back of the paper is completely wet.
Fold the paper
- Lay the wet paper out flat on the plastic sheet, paste side up.
- Fold loosely – don’t crease – from the bottom edge, up to one-third of the length.
- Fold the top down to overlap the first fold by 10mm. The larger fold should be at the top of that length.
- Soak and fold several lengths.
- Drain and leave the folded lengths for about 8-10 minutes. This allows the paper – and you – to relax before the next step: putting the paper on the wall.
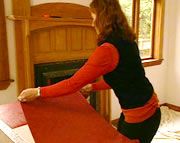
Un-pasted paper
What you need
- A pasting table: you can hire or borrow one; or make do with the kitchen table—but cover it first.
- Wallpaper size (SHUR-STIK Latex) and paste (Metylan Special).
- A pasting brush.
Mix the paste
![]()
If your wallpaper is the un-pasted type, mix the METYLAN Special wallpaper paste according to the instructions on the label, to ensure you have the right consistency.
Applying the paste
- Place the cut lengths face down on the table. Make sure they are all laid out in the same direction – all top edges together, therefore all bottom edges together.
- Now paste the back of the paper with METYLAN Special, SHUR-STIK paste/adhesive or BEELINE, applying it evenly in a zigzag pattern, pasting from the centre out. Make sure the edges are well coated, and the paste is evenly applied over the full length of the paper.
- Fold the ends towards the centre, with a smaller fold to the bottom and a larger fold at the top. This will easily identify the hanging direction to the paper. Make sure the folds don’t crease.
- Now leave each length to rest for 10 to 15 minutes. More relaxation time for you, too.
Quick tip: Give yourself plenty of time—no need to rush.
You’re ready for the final step… let’s decorate!
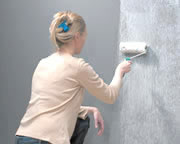
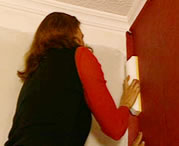
Hang the paper
Hanging the wallpaper strips
Always start hanging wallpaper near the main source of natural light, and work away from it, finishing in a discreet area, such as behind a door.
First strip
- Step up the ladder to the ceiling with your pasted wallpaper and unfold the top portion.
- Position the paper to correspond with the pencil marks you made on the wall.
- Press it against the wall, leaving 5cm for trimming along the ceiling line.
- Line the paper against your plumbline.
- Moving down and out from the centre, stroke the paper against the wall, using a brush or smoother to position it.
- Unfold the bottom of the strip and press it against the wall, again checking it against the plumbline.
- When you are satisfied with its position, smooth it over fully, removing any air bubbles. Don’t rush.
- Then, use your knife to cut any extra paper at the ceiling and floor.
- Remove any extra paste by carefully sponging it off with clean water.
Next strips
That’s the first length up; now for the next one.
- Slide the paper into position on the wall so the pattern (if there is one) is matched and the joins are butted together.
- Now, use your smoothing brush to help link up the seams.
Follow this process for the rest of the lengths; prepare in advance for corners and tricky areas like power points.
Quick tip: Clean off any paste on the skirting, cornice or ceiling as you go…
Paste-the-wall papers
![]()
Paste-the-wall products have a specially developed backing which does not expand, allowing it to be hung dry, without having to soak in water, straight from the roll.
Most people find this cuts the decorating time in half – and because the pasting table process is eliminated, it’s less messy too. This type of wallpaper is great for beginners.
- Don’t paste the entire wall before starting to hang your wallpaper. Paste one section of the wall at a time so that the paste doesn’t dry out. Allow some overlap – paste a bit more of the wall than just the width of each cut piece.
- Slide the paper into place and check the match. No need to rush.
- Then trim off to fit at the top and bottom edge.
And when you decide it’s time for a new look, paste-the-wall wallpapers usually peel off easily. Simply lift a corner at the base of the wall and peel upwards.
Dealing with corners
The extra 15mm will wrap around the corner onto the next wall.
Don’t try to hang a full width of wallpaper around a corner, as the walls are rarely straight. Always hang the paper in two parts.
- Measure from the edge of the last strip into the corner, and add another 15mm before you cut the strip of wallpaper to size. The extra 15mm will wrap around the corner onto the next wall.
- Start the next strip of paper in the corner, overlapping the 15mm of paper from the last drop.
- Use an adhesive like SHUR-STIK to stick down the overlaps.
Keep going, don’t rush, and soon you will have a completed room or wall to stand back and admire. Congratulations, you did it!
Tricky Areas
Switches and power points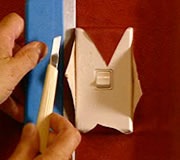
- Make sure the electricity is turned off at the mains.
- Paper straight over the top of the fitting.
- Taking care not to cut into the plastic cover, make two diagonal cuts from corner to corner, across the fitting.
- This forms four flaps, which you can crease against the side of the fitting and then trim off snug against its edges.
- Then you can put the power back on.
Windows and door frames
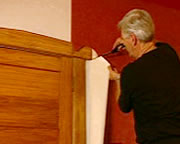
- Hang the length of wallpaper so that it overlaps the frame.
- Make the paper on the actual wall as smooth as possible.
- Make a diagonal cut in the paper to the corner point of the frame.
- Lift the flaps and carefully smooth the paper into the frame’s edges.
- Then crease and trim the paper.